Strategies of Scalability
The workload is the most popular reason we scale our applications, but it’s not the only reason. We also scale our applications to increase their availability and tolerance to failure.
Cloning
The easiest thing to do to scale a big application is to clone it mulitple times and have each cloned instance handle part of the workload(with a load balancer). This does not cost a lot in term of development time and it’s highly effective. This strategy is the minimum you should do and Node.js has the built-in module, cluster, to make is easier for you to implement the cloning strategy on a single server.
Decomposing
We can also scale an application by decomposiing it based on functionalities and services. This means having mulitple, different applications with different code bases and sometimes with their own dedicated databases and User Interfaces.
This strategy is commonly associated with the term Microservice, where micro indicates that those services should be small as possible, but in reality, the size of the service is not what’s important but rather the enforement of loose coupling and high cohesion between services.
Splitting
We can also split the application into multiple instances where each instance is responsible for only a part of the application’s data. This strategy is often named horizontal partitioning, or sharding, in database. Data partitioning requires a lookup step before each operation to determine which instance of the application to use.
Successfully scaling a big application should eventually implement all three strategies.
The Cluster Module
The cluster module can be used to enable load balancing over an environement’s multiple CPU cores. It’s based on the child process module fork method and it basically allows us to fork the main application process as many times as we have CPU cores. It will then take over and load balance all requests to the main process across all forked processs.
The cluster module is Node’s helper for us to implement the cloning scalability strategy, but only on one machine. When you have a big machine with a lot resources or when it’s easier and cheaper to add more resources to one machine ratherthan adding new machine, the cluster module is a greate option for a really quick implementation of the cloning strategy.
Even small machines usually have multiple cores and even if you’re not worried about the load on your Node server, you should enable the cluster module anyway to increase your server availability and fault-tolerance.
It’s a simple step and when using a process manager like PM2, for example, it becomes as simple as just providing an argument to the launch command.
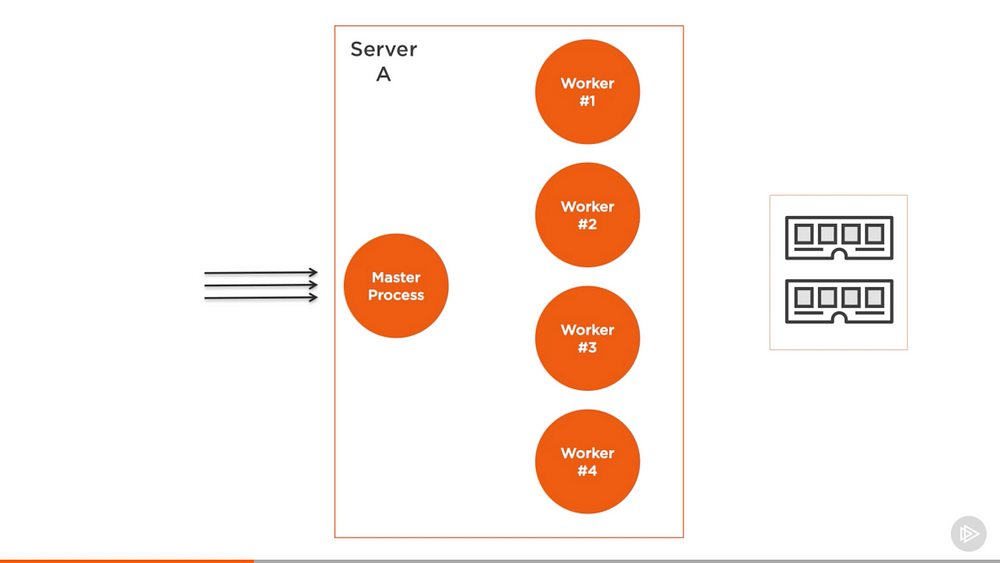
The structure of what the cluster module does is simple. We create a master process and that master process forks a number of worker processes and manage them. Each worker process represents an instance of the application that we want to scale. All incoming requests are handled by the master process, which is the one that decides which worker process should handle the incoming request.
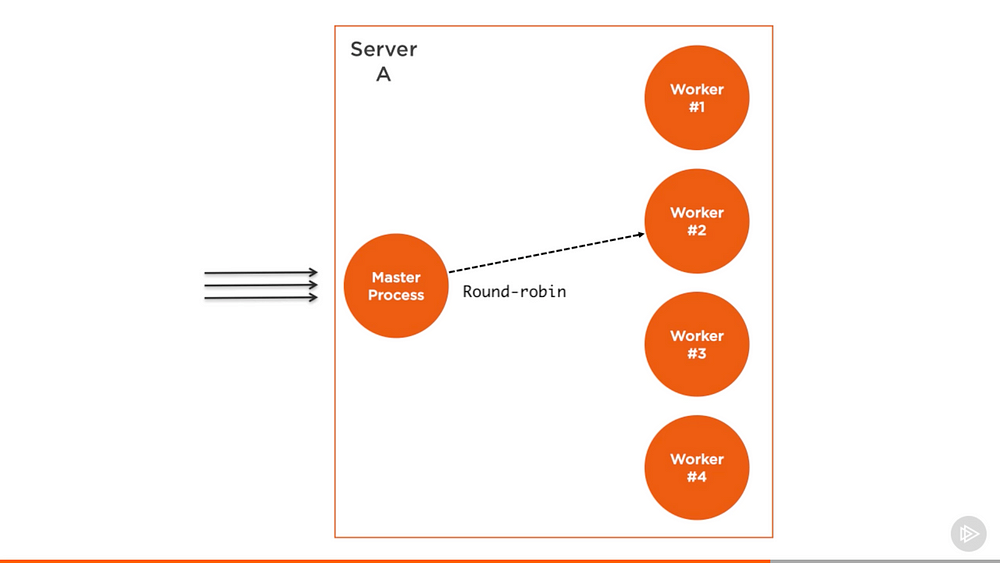
The master process’s job is easy because it actually just uses a round-robin algorithm to pick a worker process. This is enabled by default on all platform except windows and it can be globally modified to let the load-balancing be handled by the operation system self.
The round-robin algorithm distributes the load evenly across all available processes on a rotational basis. The first request is forwarded to the first worker process, the second to the next worker process in the list, and so on. When the end of the list is reached, the algorithm starts again from the beginning.
Load-Balancing an HTTP Server
Let’s clone and load balance a simple HTTP server using the cluster module.
Here’s the simple Node’s hello-world example server slightly modified to simulate some CPU work before responding:
1 | // server.js |
Before we create a cluster to clone this server into multiple workers, let’s do a simple benchmark of how many requests this server can handle per second. We can use Apache benchmarking tool for that.
After running the simple server.js code above, run this ab command:
1 | ab -c200 http://localhost:8080/ |
This command will test-load the server with 200 concurrent connections for 10 seconds.
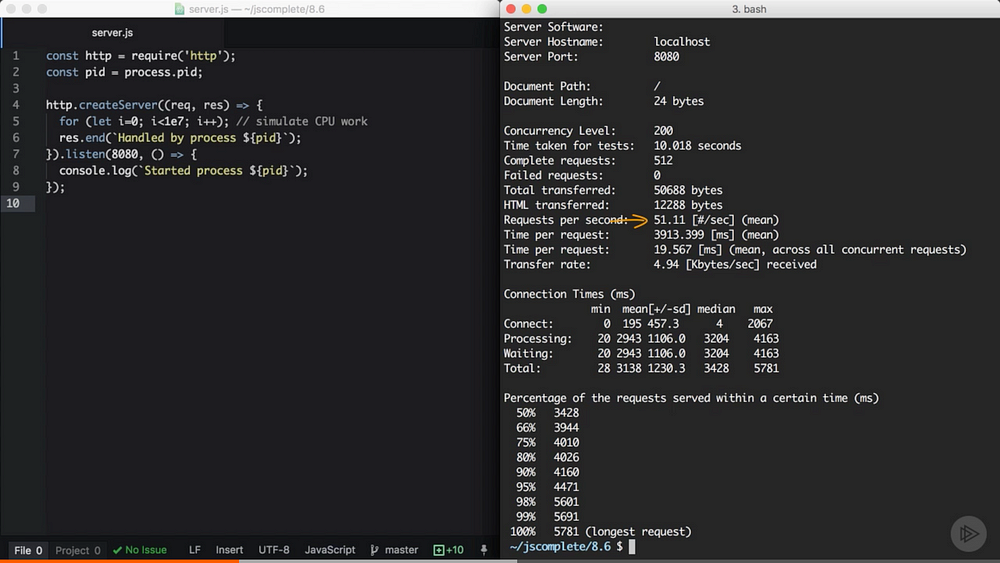
The single node server was able to handle about 51 requests per seconds.
Now that we have a reference benchmark, we can scale the application with the cloning strategy using the cluster module.
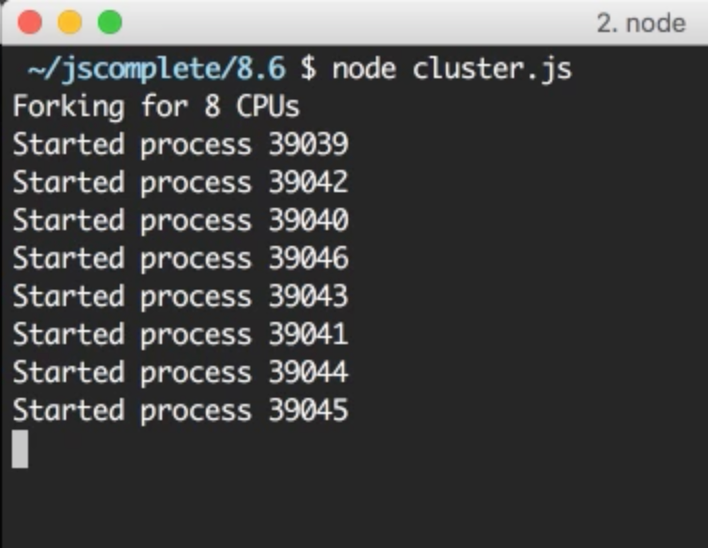
On the same level as the server.js file above, we can create a new file(cluster.js) for the master process with this content:
1 | // cluster.js |
In cluster.js, we first required both the cluster module and the os module, we use the os module to read the number of CPUS cores we can work with using os.cpus().
The cluster module gives us the handy Boolean flag isMaster to determine if this cluster.js file is being loaded as a master process or not. The first time we execute this file, we will be executing the master process and that isMaster flag will be set to true. In this case, we can instruct the master process to fork our server as many times as we have CPU cores.
Now we just read the number of CPUs we have using the os module, then with a for loop over that number, we call the cluster.fork method. The for loop will simple create as many workers as the number of CPUs in the system to take advantage of all the available processing power.
When the cluster.fork line is executed from the master process, the current file, cluster.js, is run again, but this time in worker mode with the isMaster flag set to false.
There is actually another flag set to true in this case if you need to use it, which is the isWorker flag.
When the application runs as a worker, it can start doing the actual work. This is where we need to define our server logic, which, for this example, we can do by requiring the server.js file that we already have.
That’s basically it. That’s how easy it is to take advantage of all the processing power in a machine. To test the cluster, run the cluster.js file.
It’s important to understand that these are completely different Node.js processes. Each worker process here will have its own event loop and memory space.
When we now hit the web server multiple times, the requests will start to get handled by different worker processes with different process ids. The worker will not be exactly rotated in sequence because the cluster module performs some optimizations when picking the next worker, but the load will be somehow distributed among the different worker process.
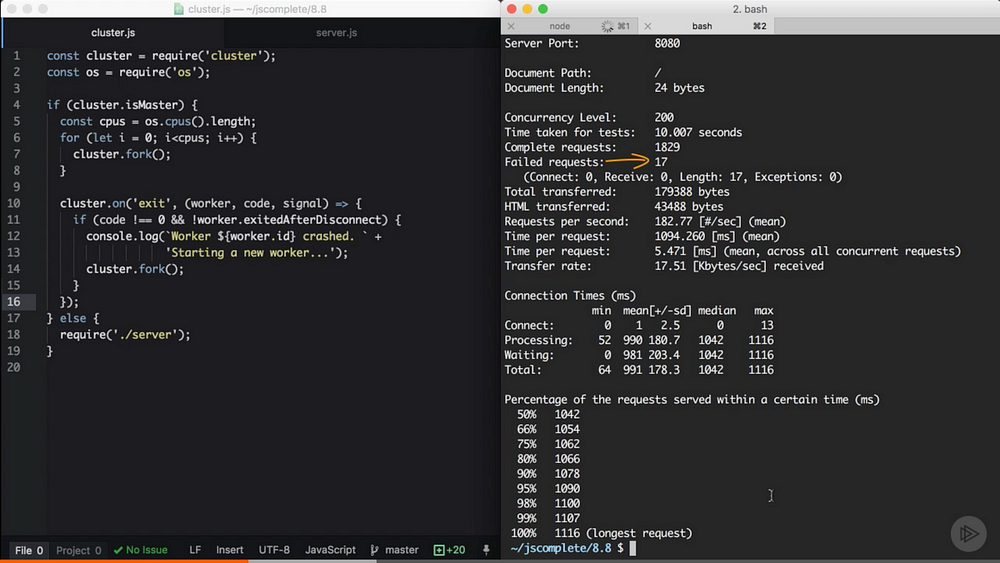
We can use the same ab command above to load-test this cluster of processes:
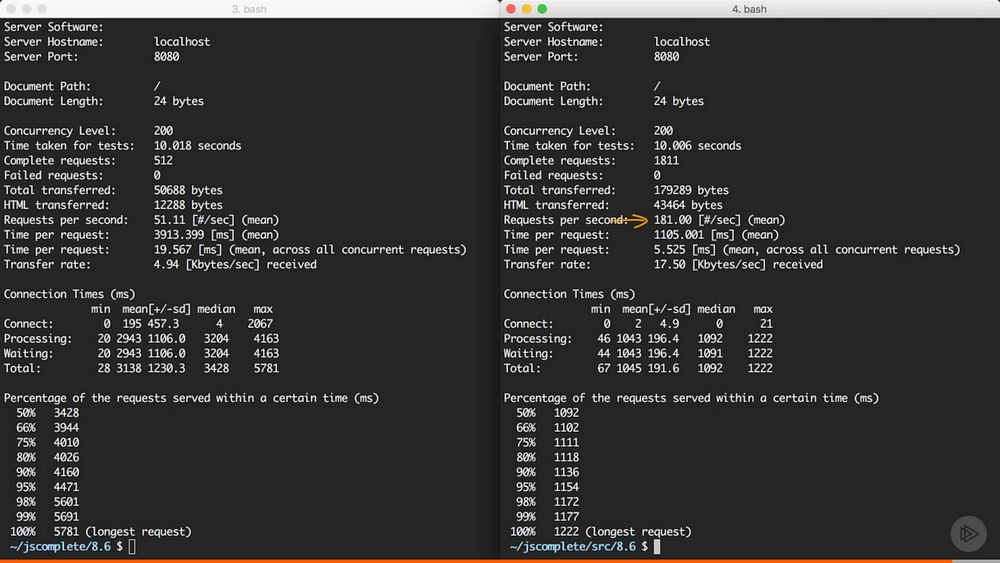
Now the cluster can handle 181 requests per seconds.
Broadcasting Messages to All Workers
Communicating between the master process and the workers is simple because under the hood the cluster module is just using the child_process.fork API, which means we also have communication channels available between the master process and each workers.
Based on the server.js/cluster.js example above, we can access the list of worker objects using cluster.workers, which is an object that holds a reference to all workers and can be used to read information about these workers. Since we have communication channels between master process and all workers, to broadcast a message to all them we just need a simple loop over all the workers:
1 | Object.values(cluster.workers).forEach(worker => { |
We simple used Object.values to get an array of all workers from the cluster.workers object. Then for each worker we can use the send function to send over any value that we want.
In a worker file, server.js in our example, to read a message received from this master process, we can register a handler for the message event on the global process object:
1 | process.on('message', (msg) => { |
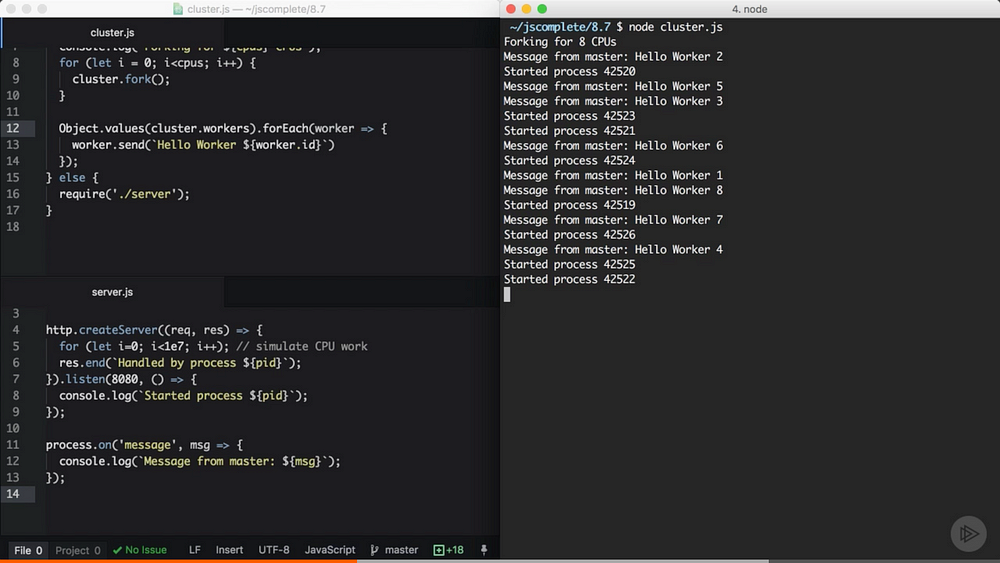
Every worker received a message from the master process. Note how the workers did not start in order.
Let’s make this communication example a little bit more practical. Let’s say we want our server to reply with the number of users we have created in our database. We will create a mock function that returns the number of users we have in the database and just have it square its value every time it’s called:
1 | // **** Mock DB Call |
Every time numberOfUsersInDB is called, we’ll assume that a database connection has been made.
In the master process mode, we can use the same loop to broadcast the users count value to all workers:
1 | // Right After the fork loop within the isMaster=true block |
Here we’re invoking updateWorkers for the first time and then invoking it every 10 seconds using a setInterval. This way, every 10 seconds, all workers will receive the new user count value over the process communication channel and only one database connection will be made.
In the server code, we can use the userCount value using the same message event handler. We can simply cache that value with a module global variable and use it anywhere we want.
1 | const http = require('http') |
The above code makes the worker web server respond with the cached usersCount value. If you test the cluster code now, during the first 10 seconds you’ll get ‘25’ as the users count from all workers(and only one DB request would be made). Then after another 10 seconds, all workers would start reporting the new user count: 625(and only one DB request would be made).
This is all possible thanks to the communication channels between the master process and all workers.
Increasing Server Availability
One of the problems in running a single instance of a Node application is that when that instance crashes, it has to be restarted. This means some downtime between these two actions, even if the process was automated as it should.
This also applies to the case when the server has to be restarted to deploy new code. With one instance, there will be downtime which affects the availability of the system.
When we have multiple instances, the availability of the system can be easily increased with just a few extra lines of code.
To simulate a random crash in the server process, we can simply do a process.exit call inside a timer that fires after a random amount of time:
1 | // In server.js |
When a worker process exits like this, the master process will be notified using the exit event on the cluster model object. We can register a handler for that event and just fork a new worker process when any worker process exits.
1 | // Right after the fork loop within the isMaster=true block |
It’s good to add the if condition above to make sure the worker process actually crashed and was not manually disconnected or killed by the master process itself.
If the main process is going to kill the worker, it can use the disconnect methods on the worker and in that case, the exitedAfterDisconnect flag will be set to true. The if statement above will guard to not fork a new worker for that case.
If we run the cluster with the handler above(and the random crash in server.js), after a random number of seconds, workers will start to crash and the master process will immediately fork new workers to increase the availability of the system.
You can actually measure the availability using the same ab command and see how many requests the server will not be able to handle overall.
Zero-downtime Restarts
We have multiple instances running, so instead of restarting them together, we can simply restart them one at a time to allow other workers to continue to serve requests while one worker is being restarted.
Implementing this with the cluster module is easy. Since we don’t want to restart the master process once it’s up, we need a way to send this master process a command to instruct it to start restarting its workers. This is easy on Linux system because we can simply listen to a process signal like SIGUSR2, which we can trigger by using the kill command on the process id and passing that signal:
1 | // In Node |
This way, the master process will not be killed and we have a way to instruct it to start doing something.
SIGUSR2 is a proper signal to use here because this will be a user command. If you’re wondering why not SIGUSR1, it’s because Node uses that for its debugger and you want to avoid any conflicts..
When the master process receives the SIGUSR2 signal, that means it’s time for it to restart its workers, but we want to do that one worker at a time. This simply means the master process should only restart the next worker when it’s done restarting the current one.
1 | function restartWorker = (workerIndex) => { |
Inside the restartWorker function, we got a reference to the worker to be restarted and since we will be calling this function recursively to form a sequence, we need a stop condition. When we no longer have a worker to restart, we can just return.
We then basically want to disconnect this worker (using worker.disconnect), but before restarting the next worker, we need to fork a new worker to replace this current one that we’re disconnecting.
We can use the exit event on the worker itself to fork a new worker when the current one exists, but we have to make sure that the exit action was actually triggered after a normal disconnect call. We can use the exitedAfterDisconnect flag. If this flag is not true, the exit was caused by something else other than our disconnect call and in that case, we should just return and do nothing. But if the flag is set to true, we can go ahead and fork a new worker to replace the one that we’re disconnecting.
When this new forked worker is ready, we can restart the next one.
However, remember that the fork process is not synchronous, so we can’t just restart the next worker after the fork call. Instead, we can monitor the listening event on the newly forked worker, which tells us that this worker is connected and ready. When we get this event, we can safely restart the next worker in sequence.
That’s all we need for a zero-downtime restart.
Process monitors like PM2, make all the tasks we went through so far extremely easy and give a log more features to monitor the health of a Node’s application.
Shared State and Sticky Load Balancing
When we load balance a Node application, we lost some features that are only suitable for a single process. This problem is somehow similar to what’s known in other languages as thread safety, which is about sharing data between threads. In our case, it’s sharing data between worker processes.
For example, with a cluster setup, we can no longer cache things in memory because every worker process will have its own memory space, If we cache something in one worker’s memory, other workers will not have access to it.
If we need to cache things with a cluster setup, we have to use a separate entity and read/write to that entity’s API from all workers. This entity can be a database server or if you want to use in-memory cache you can use a server like Redis or create a dedicated Node process with a read/write API for all other workers to communicate with.
Don’t look at this as a disadvantage, because using a separate entity for your application caching is part of decomposing your app for scalability. You should probably be doing that even if you’re running on a single core machine.